Suspense, Loading UI, Streaming, React Server Components
In this lesson, we'll continue with more topics around Next.js. This framework has mechanisms set up not only for routing, which we introduced last week, but also for loading states, error states and handling access to pages that don't exist. Besides that, Next.js takes advantage of the latest React capabilities, allowing the implementation of so-called React Server Components (RSC).
We will discuss server-side rendering first, then in detail the benefits of RSCs and when it is appropriate to use them. We'll also look at <Suspense> boundaries and at the streaming capabilities of Next.js, and we will finish with the rules for combining server and client components.
Everything in this lecture assumes Next.js v16 with the cacheComponents: true option in next.config.ts — exactly the setup this course app uses.
This flag turns on Cache Components, which makes Partial Prerendering the
default rendering model of the App Router. If you ever work on an older
project without the flag, the rendering rules described in the "Static shell,
cached content and streaming" section behave differently.
Server-side rendering
Before we get technical on how RSCs work, let's briefly explain server-side rendering, which is closely related to RSCs.
Motivation
Server-side rendering (SSR) is a technique where the content of a page is rendered on the server and then sent to the client. This approach has several advantages, mainly regarding SEO, page load speed, and performance. A typical example relates to e-commerce sites, where it is essential that search engines index the page's content, and it is also crucial that the page loads quickly, as every second of delay can mean a loss of a customer.
CSR user experience
If we were to use pure client-side rendering (CSR), the final page could be rendered to the user after these basic steps:
- Download the HTML, CSS, and JavaScript files.
- Parse the JavaScript files.
- These files contain the code that renders the initial page, typically a loading state. In the meantime, other JavaScript code pulls the data from the API; in the case of e-commerce, this can be a list of products.
- Once the data has arrived, the page can finally render its final form.
The problem with this approach is that it takes a long time, and for the user, it means waiting a relatively long time before they can finally interact with the page.
To demonstrate this problem, we can take any page developed in React that includes some API calls and several dependencies. We can also reduce the internet speed in DevTools to 3G and see how long it takes for the page to load, or how long the user sees a white page.
Server-side rendering was designed to address this issue and improve the user experience. It does not work on the SPA principle, where the whole application has to be downloaded and only after the entire JavaScript bundle has been downloaded can the page be rendered. SSR prepares the page already on the server, with the correct data and the document structure already rendered. Once the page arrives at the client, it can be displayed almost immediately, eliminating the phase when we need to let JavaScript get the data from the server and then render it.
Traditional SSR
In the very traditional SSR approach, the entire page is rendered on the server and sent to the client. This approach has several advantages but also several disadvantages. The advantage is that the page can be displayed instantly, which is great for UX. The downside is that it can be slow if a lot of data needs to be downloaded or if a lot of computation is needed on the server. At that point, the user isn't waiting with a blank page, but they are waiting before they can see anything at all.
This approach is one of many approaches. The page does not have to be created on-demand per request. In the case of e-commerce, we have product data that doesn't change from minute to minute. For this reason, individual product pages can be created in advance with the correct data already in place. When a user inquires about that page, they can be sent an already prepared page without recreating it. This approach is called Static Site Generation (SSG).
Data fetching
We have two ways we can get data for our application. The first one we discussed in previous lessons, and it is called client-side data fetching.
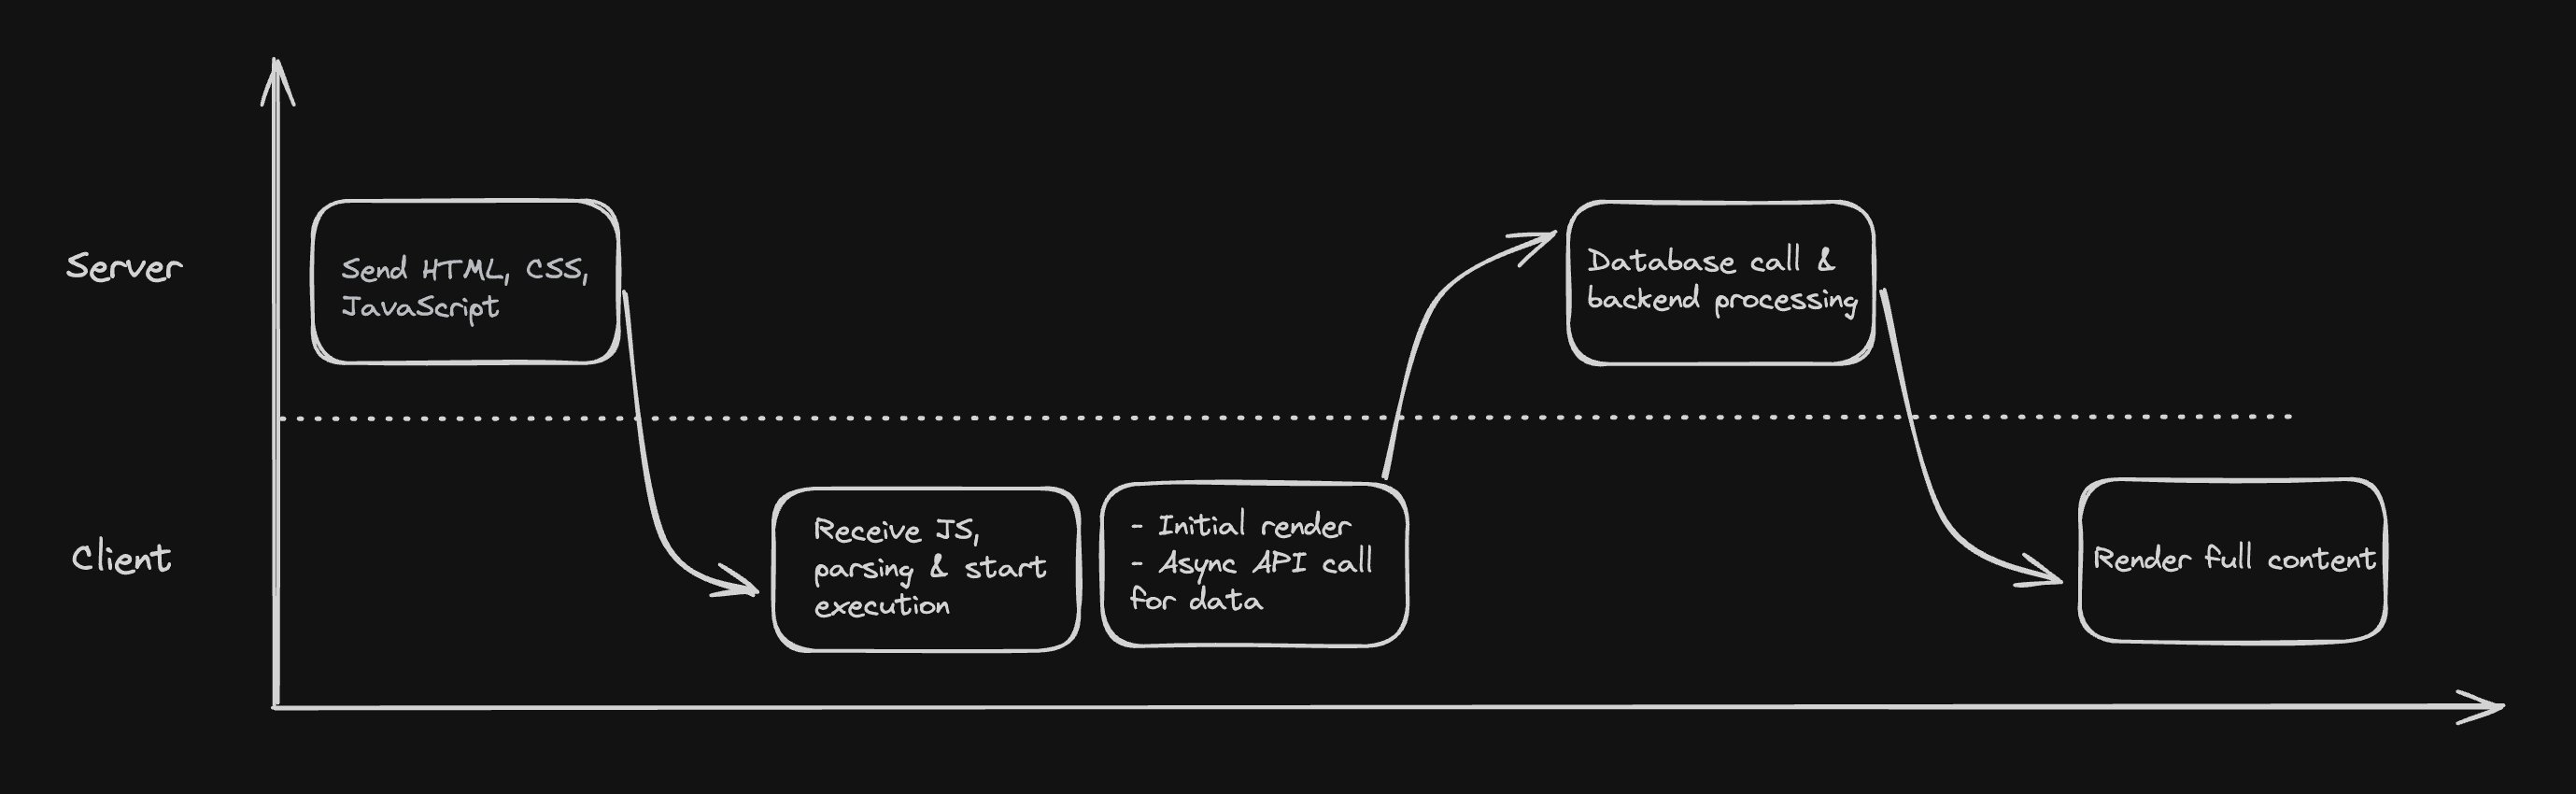
The first step is for the client (for example, a browser) to access the URL where the application is running. The server intercepts this request and returns all the files the application needs to run. After the client receives these files, a blank page is presented. Now it needs to parse the JavaScript files, which can then render something. JavaScript will typically render some loading state initially and send an asynchronous request back to the server to get the data. The server again catches the request, performs database calls, and returns the data. The client processes the data and renders it to the page.
We may notice unnecessary sending of requests back and forth. By simple reasoning, we can figure out that it might be better to move the database call before sending anything to the client. Since we can know what data is on the page, we can get it directly on the server without the need for an API call.
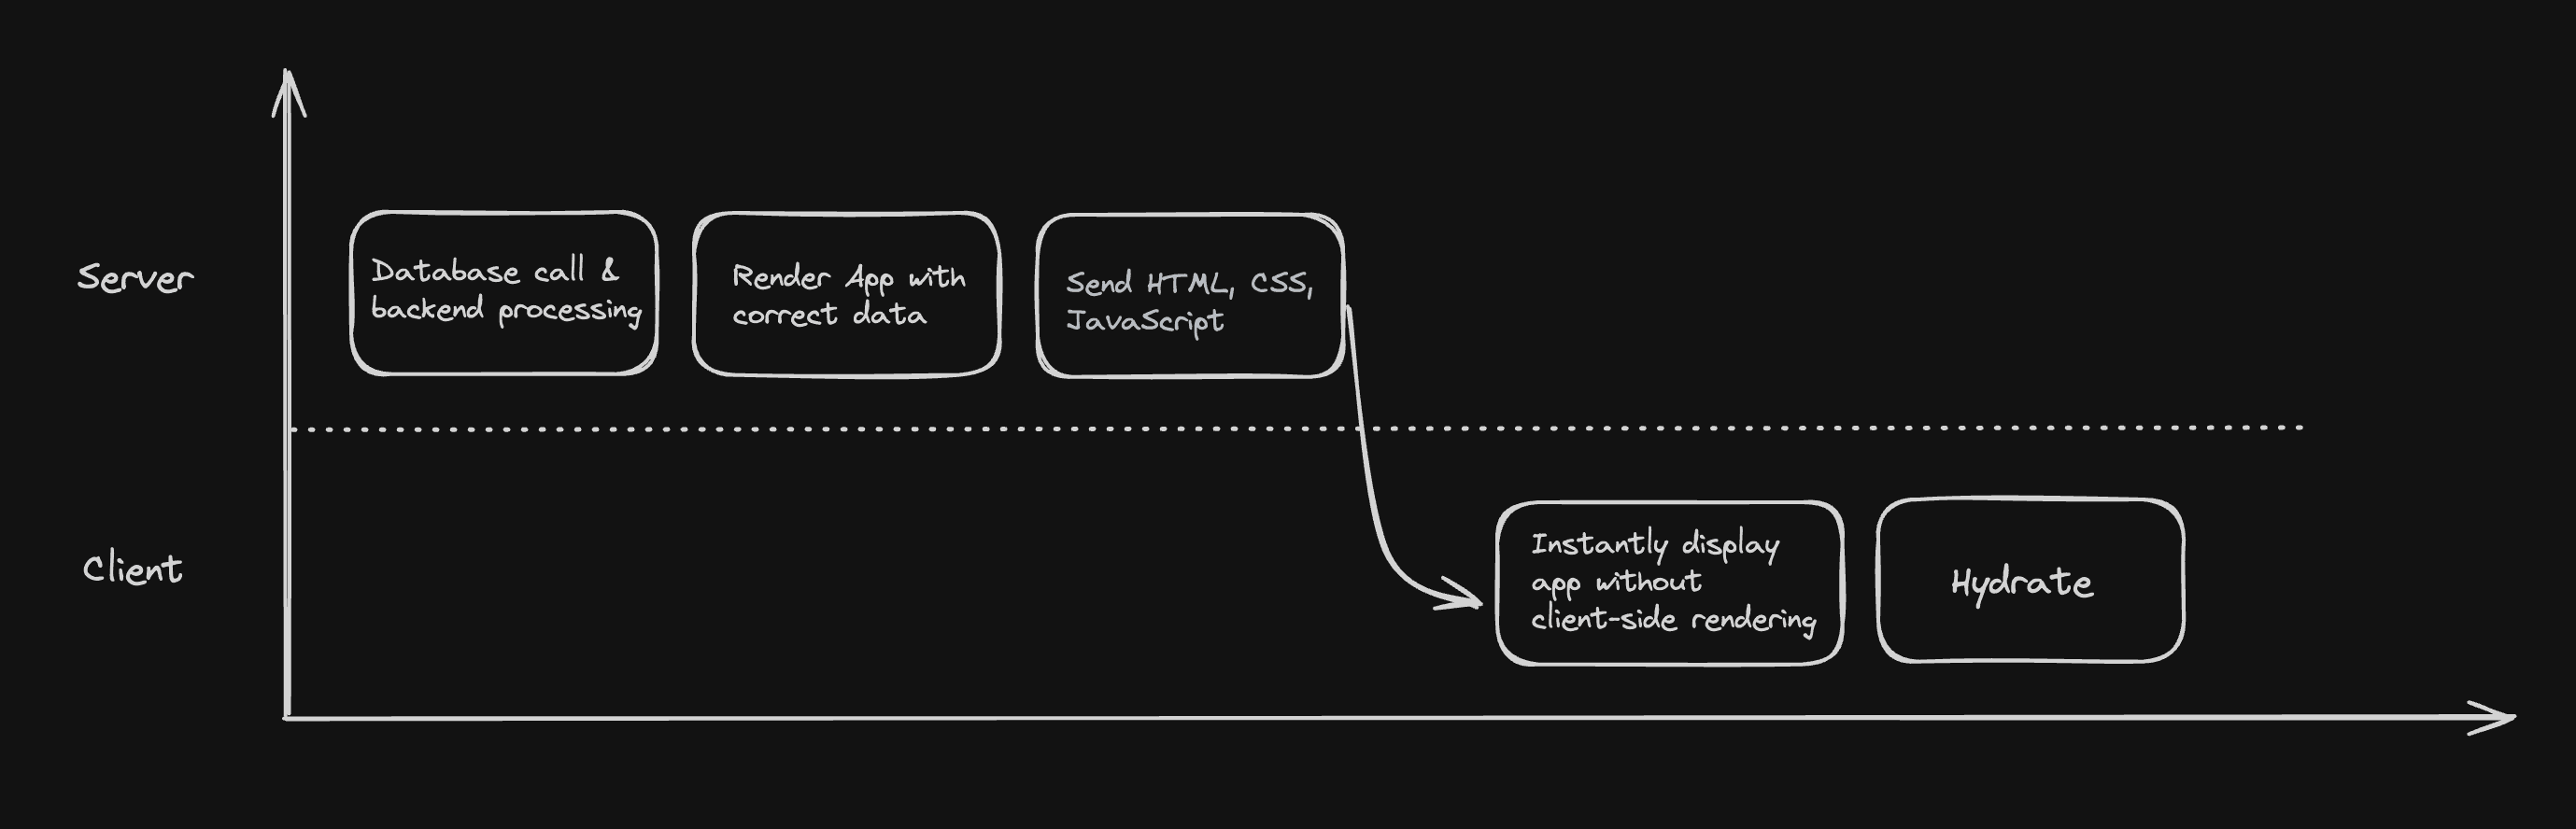
Instead of having the server and client exchange requests back and forth, we do all the work needed for the first render immediately on the server before sending it to the client for the first time. However, this model is only possible with the ability to get the data directly on the server while rendering the React component only on the server. Until recently, this model was the only one regarding SSR capabilities in React.
getServerSideProps (the old Pages Router way)
The following code is history. getServerSideProps belongs to the pages
directory (the Pages Router) and it does not exist in the app directory
that we use in this course. We show it only to explain what problem React
Server Components solve.
// pages/index.tsx — Pages Router only

// This code only runs on the server:
export async function getServerSideProps() {
  const products = await database.query('SELECT * FROM products');

  return {
    props: { products }
  };
}

// This code runs on the server + on the client
export default function Homepage({ products }) {
  return (
    <>
      <h1>Products</h1>
      {products.map(product => (
        <article key={product.id}>
          <h2>{product.title}</h2>
          <p>{product.description}</p>
        </article>
      ))}
    </>
  );
}
In the Pages Router, SSR was done using
getServerSideProps. This function was called on the server for every request and returned props that were then used to render the page.getServerSidePropsran exclusively on the server; its code was not even sent to the client.
Problems with getServerSideProps
This was a big step towards SSR and improving SEO and other things in React and Next.js. However, it had a few drawbacks, the main one being the need to wait for all server operations to finish before anything could be sent to the browser. We might have wanted to fetch server data that is needed only for a minor part of the application. Ideally, the rest of the application could be delivered to the client immediately, with a loader displayed only for that one small part of the UI. This was not possible with getServerSideProps. The second problem is that the data we get in getServerSideProps is only available in the page component. To get it into the component it belongs to, we have to pass it down through props or use context.
React Server Components
A React Server Component runs exclusively on the server.
This is still a relatively new programming concept in React, where we can create asynchronous components that get data from sources that are only available on the server (not on the client), such as a database or the file system.
// app/page.tsx — this code runs exclusively on the server
export default async function Homepage() {
  const products = await database.query('SELECT * FROM products');

  return (
    <>
      <h1>Products</h1>
      {products.map(product => (
        <article key={product.id}>
          <h2>{product.title}</h2>
          <p>{product.description}</p>
        </article>
      ))}
    </>
  );
}
This approach is dramatically different from what
getServerSidePropsallows. With a React Server Component, we can retrieve data on the server almost anywhere in our application, so there is no need to fetch all the data in one place as there was withgetServerSideProps.
It is essential to note that a server component never re-renders in the browser. It is rendered on the server, and its output is sent to the client, where it will never be re-rendered because of user interaction, state changes, etc. It can, of course, be rendered again on the server — for a new request, for a new navigation, after router.refresh(), or when a cache entry it depends on is revalidated — but that always produces a fresh result from the server, not a client-side re-render.
- Related to this is that a large part of the React API is unavailable in RSC. The rule of thumb is that we must not use state, effects, context or event handlers there: no
useState,useReducer,useEffect,useContext, noonClick, and no browser APIs such aswindoworlocalStorage.
It's a significant change in the mental model when programming React applications. To implement an interactive application, we must, of course, remember to use the classic client component. There we can still use all the React APIs, including hooks like useState.
You can't use React Server Components in pure React
Even though RSCs are directly part of React, it is impossible to "simply" use them without a framework like Next.js. Server Components need a bundler and a router that understand them, and the React documentation states that the underlying APIs used to implement an RSC bundler or framework are not covered by semantic versioning. In practice, you always use them through a framework such as Next.js.
Next.js v13+
As we mentioned in the last lesson, the Next.js framework has a built-in routing system where we define individual routes inside the app folder. This has been the case since version 13; before that, it was only possible to use the pages folder, which also defined routes by the file system, just slightly differently.
Importantly, since version 13, with the advent of the app directory, all components are server components by default! If we want to implement an interactive component using any of the React APIs listed above, we must explicitly mark it as a client component.
'use client';

import { useState } from 'react';

export default function Counter() {
  const [count, setCount] = useState(0);

  return (
    <button onClick={() => setCount(count + 1)}>Current value: {count}</button>
  );
}
Server component or client component?
The basic rule of thumb is that if a component can be a server component (i.e., it requires no interactivity), it should be a server component. In other words, if we can write a component so that no additional and unnecessary JavaScript code needs to be sent for it, we should do so. On the other hand, there is no need to be afraid of client components. Before RSC, all components in React were client components. If we need to implement a form or some other interactive component, we simply do it as a client component. Use a client component whenever you need state, event handlers, lifecycle logic, browser-only APIs such as localStorage or window, or custom hooks that use any of these.
We'll learn about the rules for combining server and client components later in this lesson.
Loading state
First, we'll look at the motivation for creating a loading state on the screen in the first place, and then we'll show how we can create a loading state in Next.js in combination with RSC.
Why is it important to show loading states?
Providing an instant loading state, such as a spinner or skeleton UI, is crucial in web development, particularly in frameworks like Next.js, where server-side rendering and dynamic content are common. It ensures a seamless and user-friendly experience by reducing perceived latency. When a page requires time-consuming operations, like fetching data or rendering dynamic content, users might otherwise perceive the page as slow or unresponsive. By displaying an instant loading state, you communicate to users that their request is being processed, keeping them engaged and informed, which in turn enhances the overall user experience. This practice not only makes your application appear faster but also demonstrates a commitment to user-centric design, which is essential for retaining and satisfying your audience.
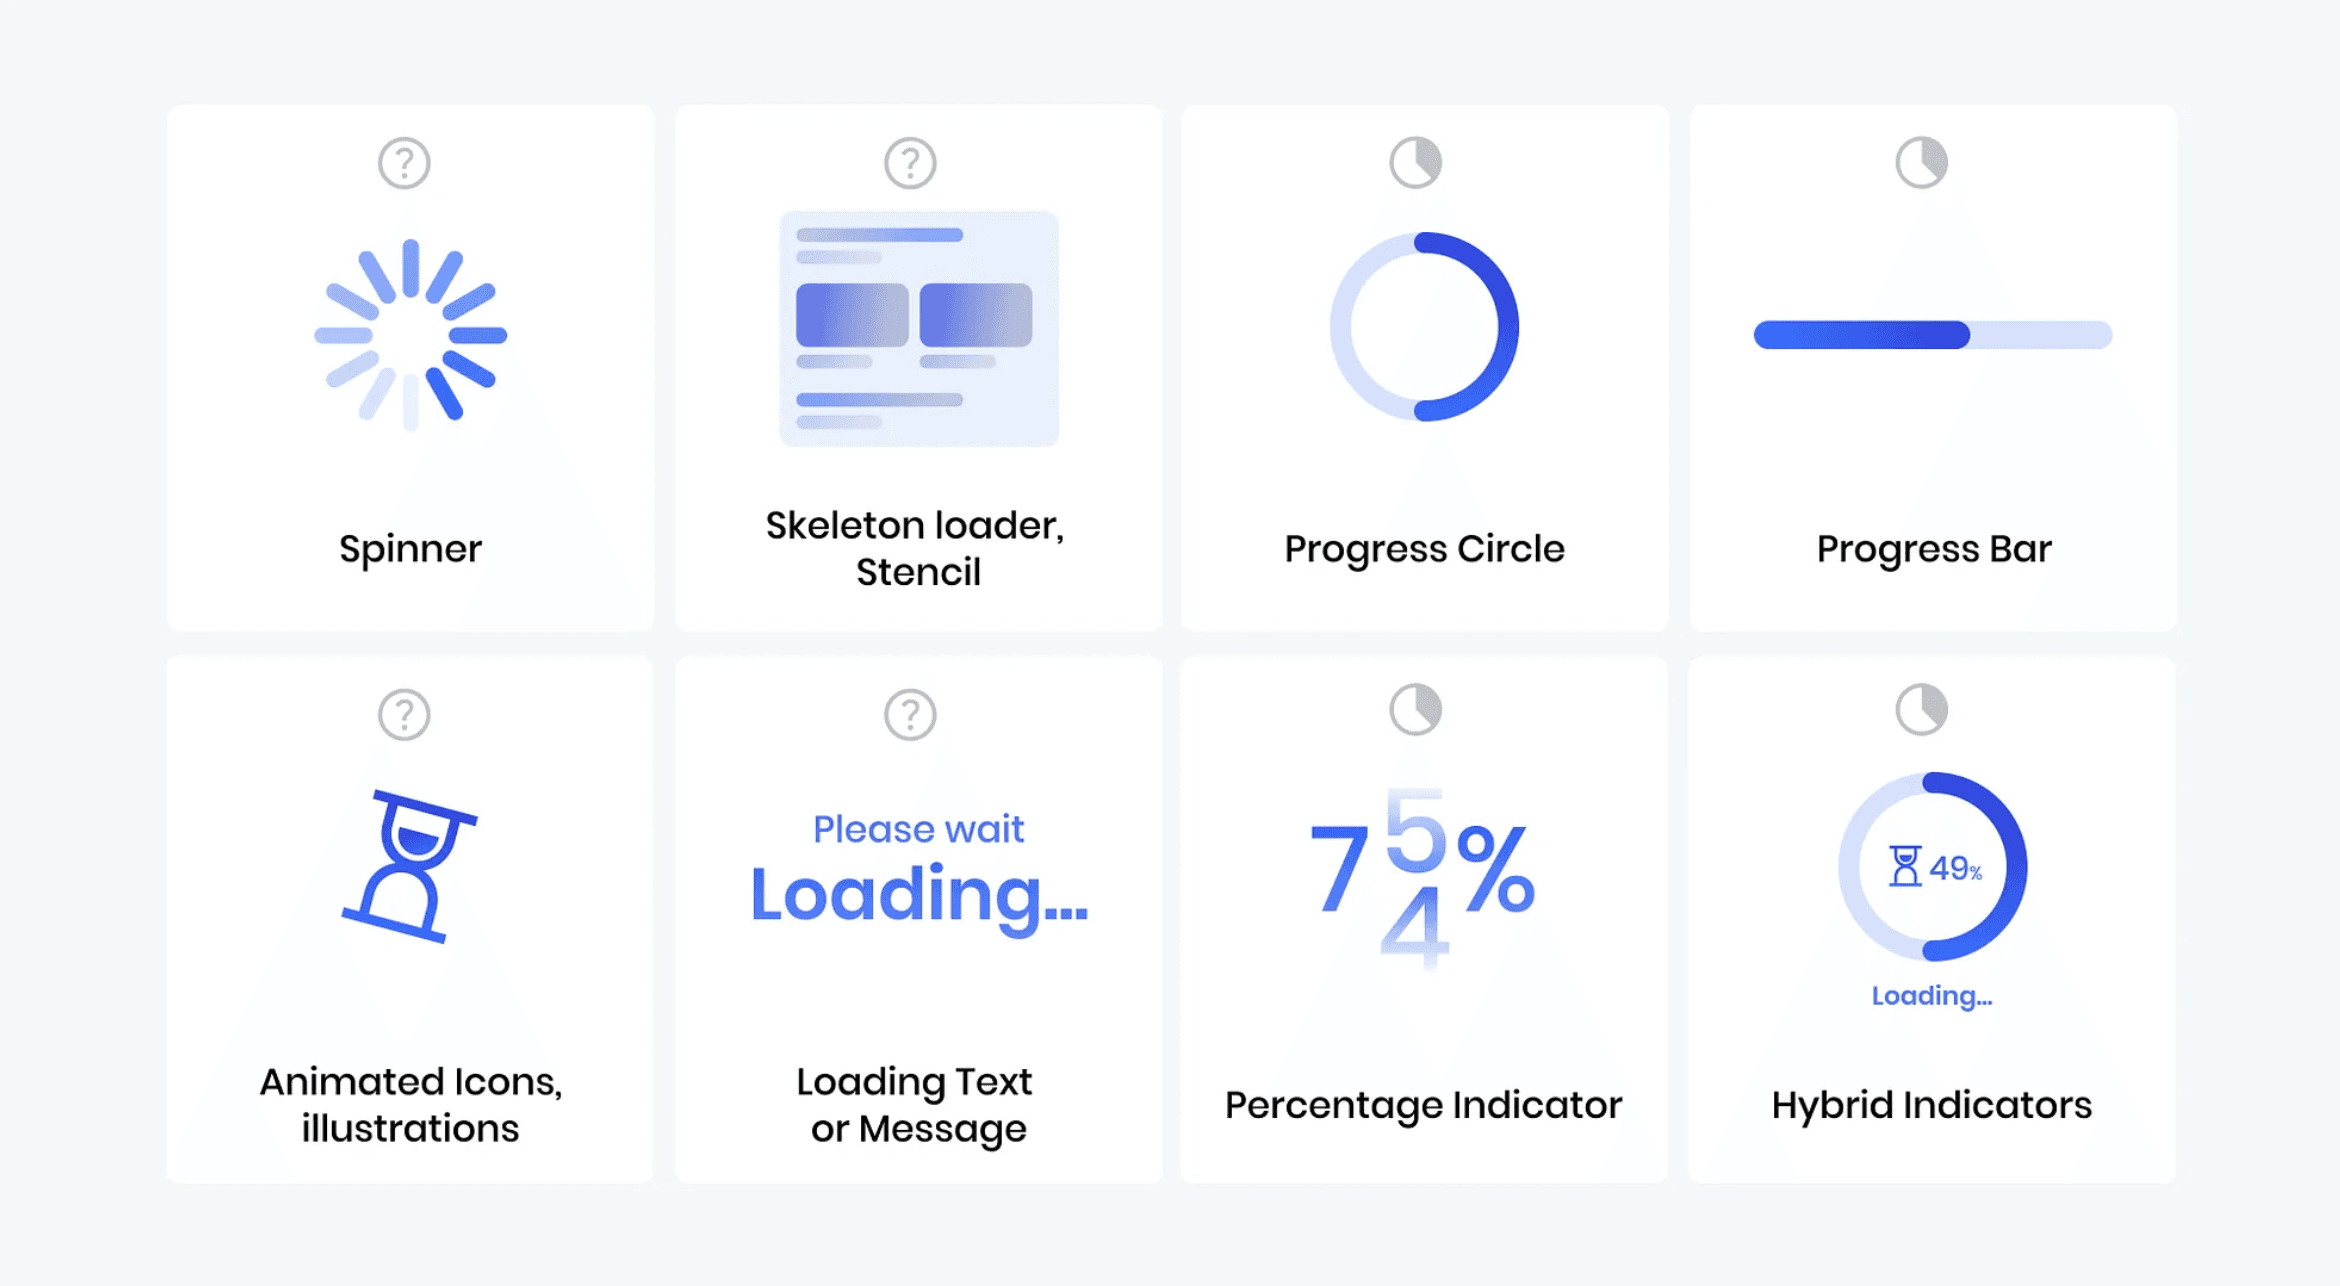
There are many ways to present a loading state. A skeleton that matches the shape and the size of the final content is usually the best choice, because the layout does not jump once the real content arrives (this is what the Cumulative Layout Shift metric measures).
Suspense boundaries
Loading states in Next.js are implemented using Suspense boundaries. <Suspense> is a React component that lets you "wait" for something to load asynchronously. It also allows you to specify the loading UI that should be displayed in the meantime.
import { Suspense } from 'react';

function LoadingComponent() {
  return <p>Loading...</p>;
}

async function SomeAsyncComponent() {
  const data = await getData();

  return <div>{data.title}</div>;
}

export default function Page() {
  return (
    <Suspense fallback={<LoadingComponent />}>
      <SomeAsyncComponent />
    </Suspense>
  );
}
The Suspense component accepts children as a prop, similarly to a layout component. If a child suspends while rendering, the Suspense boundary switches to rendering the fallback.
fallback
An alternate UI to render in place of the actual UI if it has not finished loading. Any valid React node is accepted, though in practice a fallback is a lightweight placeholder view, such as a loading spinner or skeleton. Suspense will automatically switch to the fallback when a child suspends, and back to the children when the data is ready. If the fallback itself suspends while rendering, it will activate the closest parent Suspense boundary.
Only Suspense-enabled data sources will activate the Suspense component. They include:
- Awaiting a promise in an async server component (RSC)
- Reading the value of a promise with the
usehook - Lazy-loading component code with
lazy
Important caveat: Suspense does not detect data fetched inside a
useEffect or in an event handler. If you fetch in an effect and store the
result with useState, the component renders normally with an empty state and
no fallback is ever shown. This is exactly why libraries like TanStack Query
give you their own isPending flag.
Within a Suspense boundary, we have the flexibility to use both server and client components. Even if a client component is available without any waiting, it will only become visible once all components inside the boundary are fully prepared for display. This allows you to reveal different parts of the UI together for a smoother user experience. Nonetheless, it's advisable to keep the Suspense boundary as close as possible to the specific component that truly requires it.
export default function Page() {
  return (
    <Suspense fallback={<LoadingComponent />}>
      <Biography />
      <Panel>
        <AlbumsAsyncComponent />
      </Panel>
    </Suspense>
  );
}
Components that load data don't have to be the direct child of the
Suspenseboundary. Once React reaches a component that suspends, it walks up the tree, finds the closest Suspense boundary and displays its fallback. In this example,AlbumsAsyncComponentis the only async component inside theSuspenseboundary. Once this component finishes its rendering, theSuspenseboundary will switch to rendering the actual UI. All of the components inside theSuspenseboundary will be displayed together.
Nested suspense boundaries
Let's take a similar example, but this time the Biography part also fetches data on the server, so it becomes an async component too. At the same time, we would like to ensure that we don't have to wait for both components to finish rendering before showing anything. Let's take a concrete example:
- Rendering the
BiographyAsyncComponentcomponent takes 2s - Rendering the
AlbumsAsyncComponentcomponent takes 3s
import { Suspense } from 'react';

function BigLoader() {
  return <div>Big Loader...</div>;
}

async function BiographyAsyncComponent() {
  await new Promise(resolve => {
    setTimeout(resolve, 2000);
  });

  return (
    <div>
      <h2>Biography</h2>
      <p>...</p>
    </div>
  );
}

function AlbumsLoader() {
  return <div>Albums Loader...</div>;
}

async function AlbumsAsyncComponent() {
  await new Promise(resolve => {
    setTimeout(resolve, 3000);
  });

  return (
    <div>
      <h2>Albums</h2>
      <p>...</p>
    </div>
  );
}

export default function Page() {
  return (
    <Suspense fallback={<BigLoader />}>
      <BiographyAsyncComponent />
      <Suspense fallback={<AlbumsLoader />}>
        <AlbumsAsyncComponent />
      </Suspense>
    </Suspense>
  );
}
How will the whole tree of Suspense boundaries be revealed?
- If
BiographyAsyncComponenthasn't loaded yet,BigLoaderis shown in place of the entire content area. - Once
BiographyAsyncComponentis ready,BigLoaderis replaced with the content. - If
AlbumsAsyncComponenthasn't loaded yet,AlbumsLoaderis shown in place of theAlbumscomponent. - Once
AlbumsAsyncComponentis ready,AlbumsLoaderis replaced with theAlbumscomponent.
By placing the boundaries, you decide which parts of your UI should always "pop in" together at the same time and which parts should progressively stream in as they load.
As a general best practice, it is not recommended to wrap every single component with its own Suspense boundary. Instead, it's more efficient and better organized to design the loading states of your application first and place the Suspense boundaries according to those states.
Streaming
Let's summarize how traditional SSR works - one where all the data is loaded before anything is displayed to the user. The user is then presented with the complete page, without any data fetching on the client.
- First, all data for a given page is fetched on the server.
- The server then renders the HTML for the page (executes React code on the server).
- The HTML, CSS, and JavaScript for the page are sent to the client.
- A non-interactive user interface is shown using the generated HTML and CSS.
- Finally, React hydrates the user interface to make it interactive.
These steps are sequential and blocking, meaning the server can only render the HTML for a page once all the data has been fetched. And, on the client, React can only hydrate the UI once the code for all components on the page has been downloaded.
STREAMING allows us to break down the page's HTML into smaller chunks and progressively send those chunks from the server to the client. Technically, this is done using chunked transfer encoding, and React produces the HTML chunks aligned with the <Suspense> boundaries you placed in the tree.
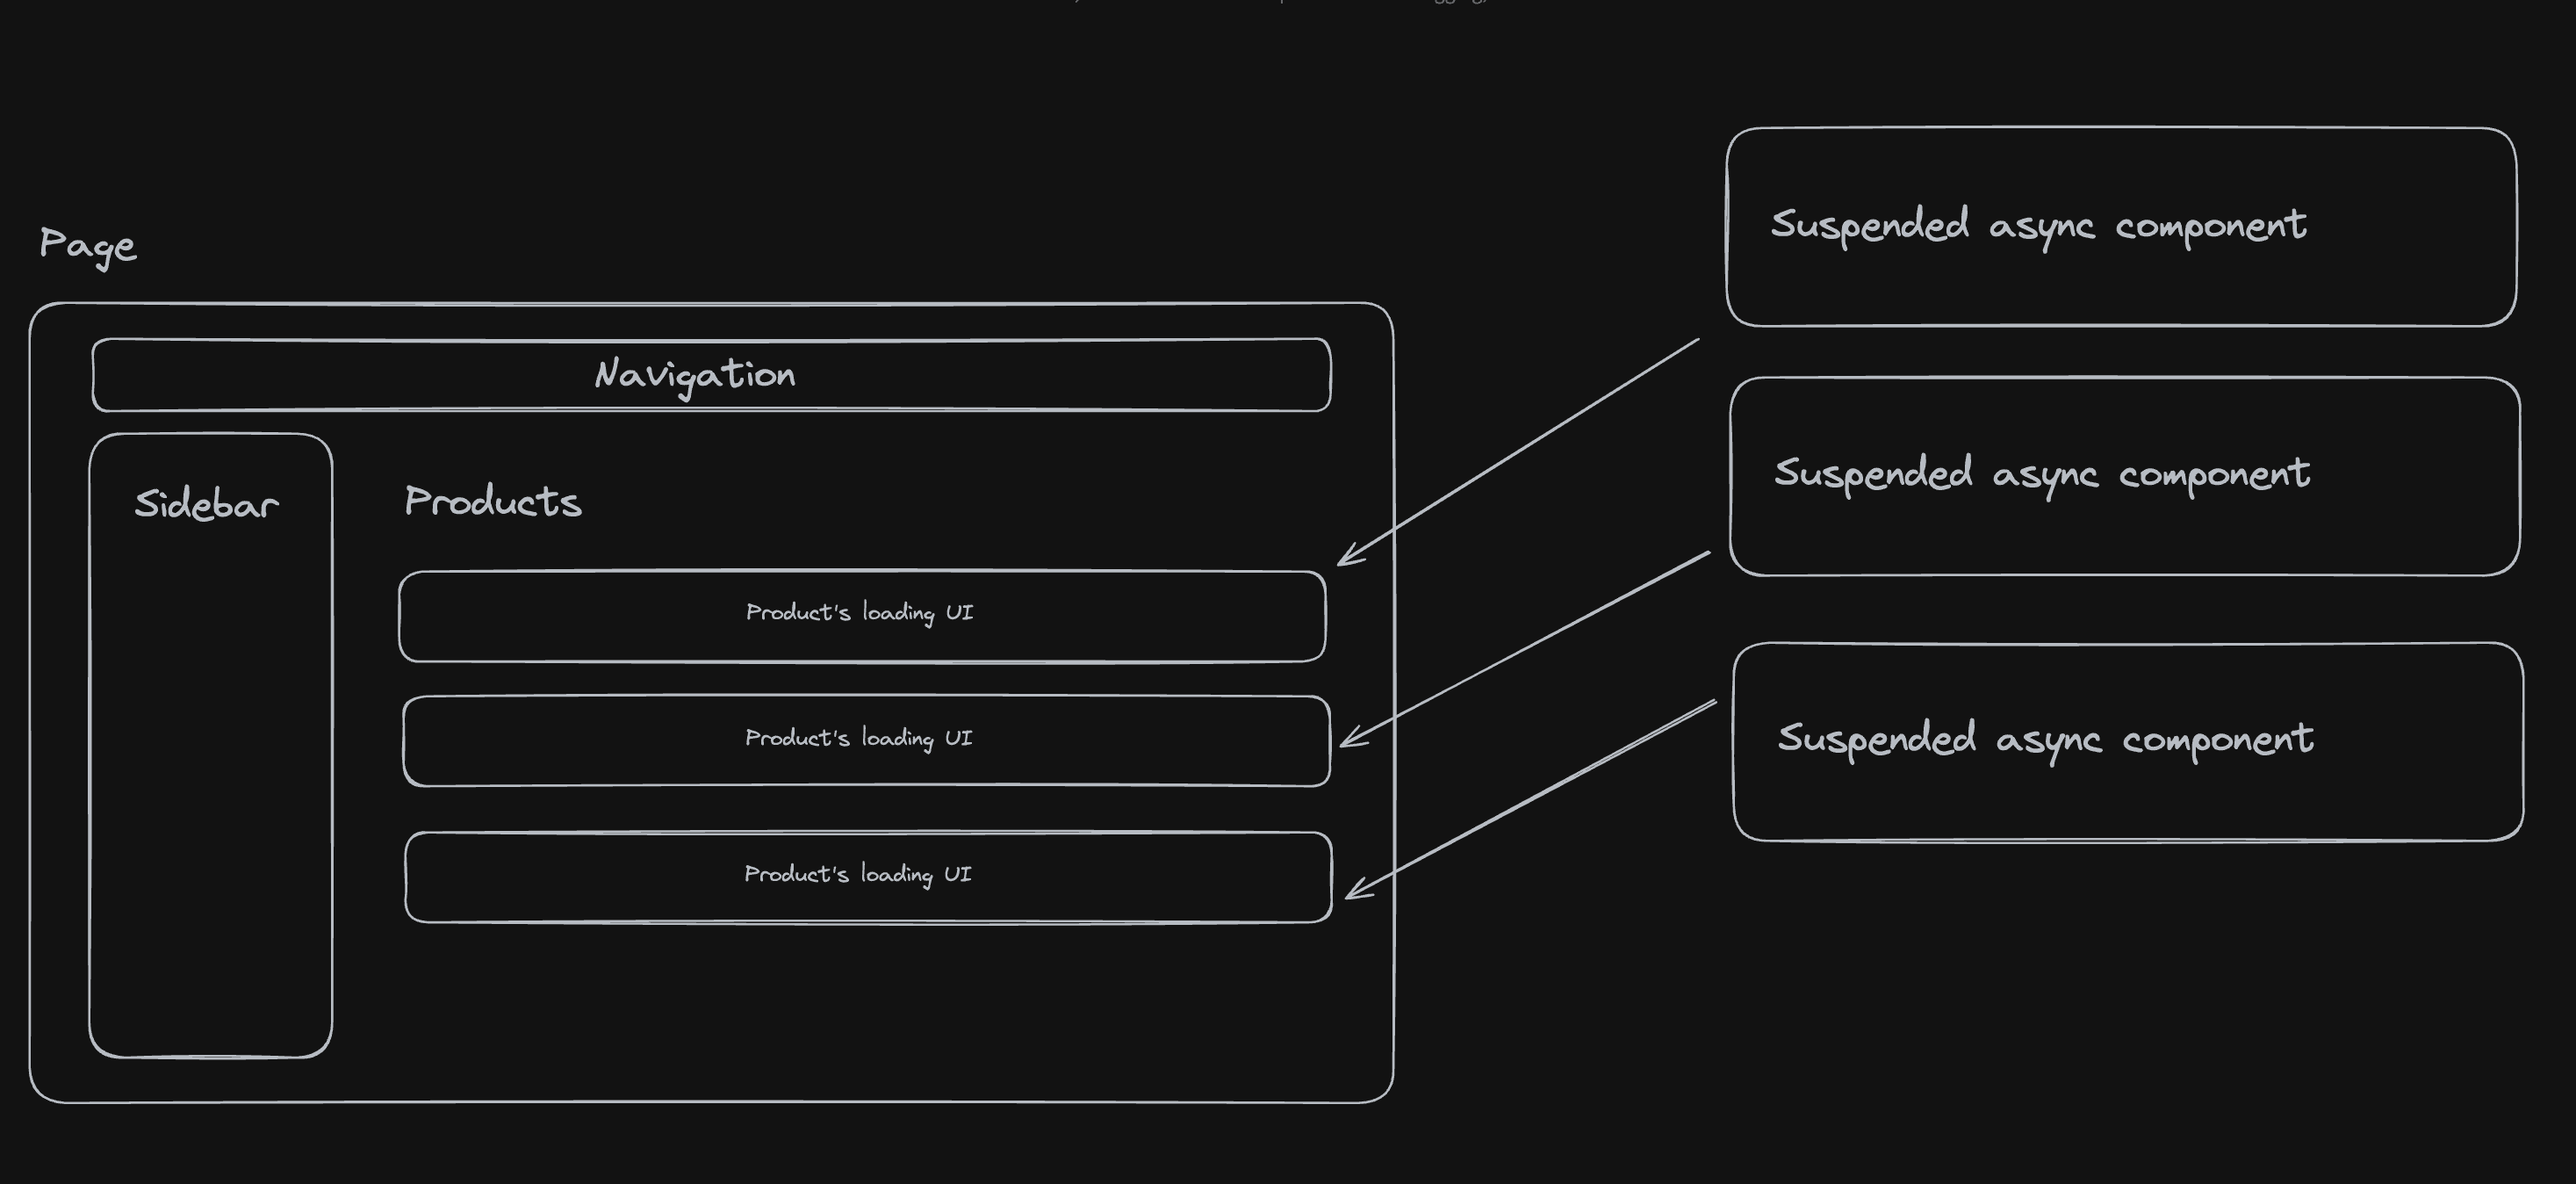
This enables parts of the page to be displayed sooner, without waiting for all the data to load before any UI can be rendered. Every <Suspense> boundary is an independent streaming point. Since not all of the components require data fetching, we can send parts of the application immediately while the other components do their data fetching. Once they have finished, their HTML is streamed to the client and swapped in place of the fallback. This primarily reduces Time To First Byte (TTFB) and First Contentful Paint (FCP). It also improves Interaction to Next Paint (INP), because each Suspense boundary is a separate hydration unit — React can hydrate the components as they arrive (so-called selective hydration) instead of hydrating the whole page in one blocking pass.
Be careful with the Largest Contentful Paint (LCP) metric. If your main heading or hero image sits inside a Suspense boundary, it cannot be painted until that boundary resolves. Keep the LCP element above the boundaries so that it is part of the initial HTML.
import { Suspense } from 'react';

function ProductBannerLoading() {
  return <div>Product Loading...</div>;
}

async function ProductBanner({ waitingTime }: { waitingTime: number }) {
  await new Promise(resolve => {
    setTimeout(resolve, waitingTime);
  });

  return (
    <div>
      <h2>Product banner</h2>
      <p>Waiting time: {waitingTime}</p>
    </div>
  );
}

export default function Page() {
  return (
    <div className="container mx-auto">
      <nav className="bg-gray-200 px-8 py-4">Navigation</nav>

      <div className="flex">
        <aside className="w-1/3 bg-gray-300">sidebar</aside>

        <main>
          <h1 className="text-3xl">Products</h1>

          <Suspense fallback={<ProductBannerLoading />}>
            <ProductBanner waitingTime={1000} />
          </Suspense>
          <Suspense fallback={<ProductBannerLoading />}>
            <ProductBanner waitingTime={2000} />
          </Suspense>
          <Suspense fallback={<ProductBannerLoading />}>
            <ProductBanner waitingTime={3000} />
          </Suspense>
        </main>
      </div>
    </div>
  );
}
This is what the code for the above diagram might look like. The individual products take different lengths of time to load, but once one product is loaded, it is immediately streamed to the client and displayed. It doesn't wait for the slowest one to display everything at once. Notice that the navigation and the sidebar are outside of every boundary, so they are part of the initial HTML and are painted straight away.
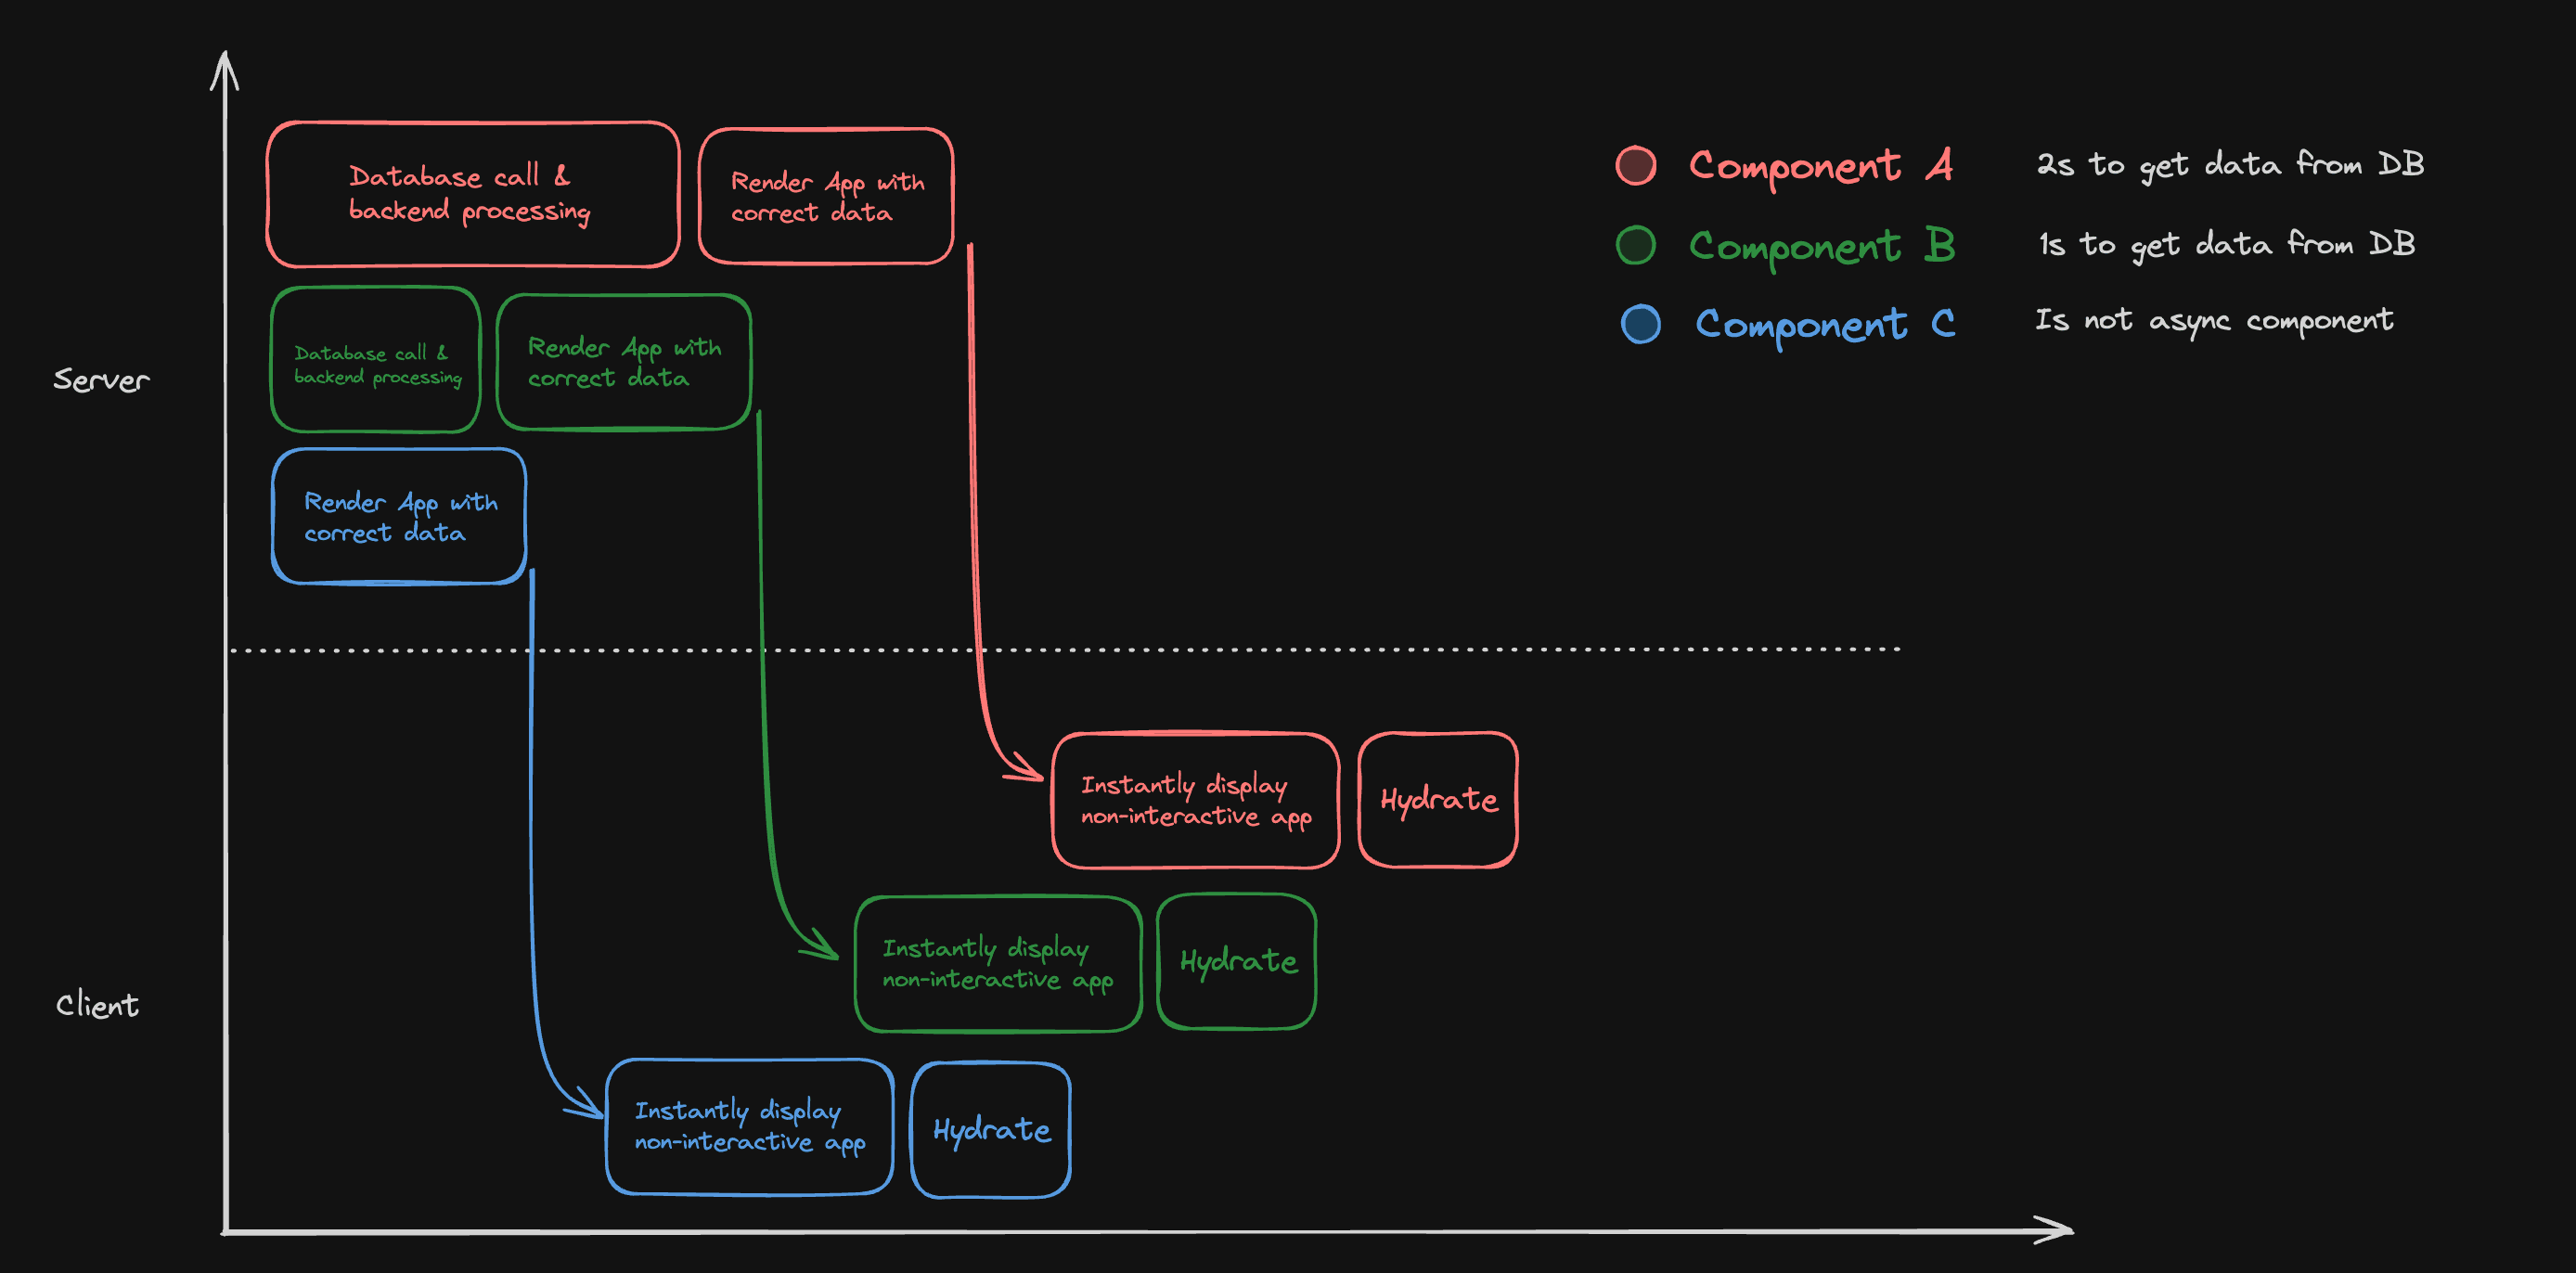
In this picture, we can see the difference in ordering between traditional SSR and streaming components. The first component to appear on the client's screen is component C, which is not asynchronous, so it doesn't have to make any calls to the database or any other resource. It just renders its HTML, which is then sent to the client. Meanwhile, components A and B have started their data retrieval in parallel. Component B finishes after 1s, renders its content, and sends it to the client, where it is displayed in place of its loading state defined in the
Suspensefallback. The same thing then happens with component A.
Client side and server side rendering
Next.js allows us to create hybrid applications, where parts of our code are rendered exclusively on the server and other parts on both the server and the client.
-
The client refers to the browser on a user's device that sends a request to a server for your application code. It receives the code and renders the UI on the client side.
-
The server refers to the computer in a data center that stores your application code, receives requests from a client, and sends back an appropriate response.
It used to be necessary to use different languages for client and server code. With frameworks like Next.js, developers can use the same language, which brings a lot of benefits. The developer experience is inarguably better. You can set up your project to easily jump from client side code to server side code, write type safe API routes, etc.
Why should we use server components?
React Server Components allow us to write UI that is rendered exclusively on the server and can optionally be cached.
There are several reasons why we should use them:
-
Data Fetching: Server Components allow you to move data fetching to the server, closer to your data source. This can improve performance by reducing the time it takes to fetch the data needed for rendering, and the number of requests the client needs to make.
-
Security: Server Components allow you to keep sensitive data and logic on the server, such as tokens and API keys, without the risk of exposing them to the client.
-
Caching: By rendering on the server, the result can be cached and reused on subsequent requests and across users. This can improve performance and reduce cost by reducing the amount of rendering and data fetching done on each request.
-
Bundle Sizes: Server Components allow you to keep large dependencies that previously would impact the client JavaScript bundle size on the server. This is beneficial for users with slower internet or less powerful devices, as the client does not have to download, parse and execute any JavaScript for Server Components.
-
Initial Page Load and First Contentful Paint (FCP): On the server, we can generate HTML to allow users to view the page immediately, without waiting for the client to download, parse and execute the JavaScript needed to render the page.
-
Search Engine Optimization and Social Network Shareability: The rendered HTML can be used by search engine bots to index your pages and social network bots to generate social card previews for your pages.
-
Streaming: Server Components allow you to split the rendering work into chunks and stream them to the client as they become ready. This allows the user to see parts of the page earlier without having to wait for the entire page to be rendered on the server.
Once more, in Next.js, all components are considered server components by default. If you want to create an interactive component, you need to explicitly mark it as a client component.
Static shell, cached content and streaming
Historically, Next.js made you choose a rendering strategy for a whole page: either the page was generated statically at build time (SSG), or it was rendered dynamically for every request (SSR). Reading cookies(), headers() or searchParams anywhere in the tree flipped the entire route into the dynamic mode, and there was nothing in between.
Since Next.js v16, with the cacheComponents: true option, this is no longer how it works. Partial Prerendering (PPR) is the default behaviour of the App Router: the choice is no longer made per page, but per component. Next.js prerenders as much of every route as it can at build time into a so-called static shell, and the rest streams in at request time.
At build time, Next.js renders the component tree of every route and sorts it into three buckets:
- Static — components that only use predictable values (module imports, pure computations, props). They finish during the build and their HTML becomes part of the static shell automatically.
- Cached — anything inside a function or component marked with the
'use cache'directive. Its result is cached and, as long as its lifetime is long enough, it also becomes part of the static shell. - Streamed — everything else: uncached data fetching and any read of request data (
cookies(),headers(),params,searchParams). This work cannot be done at build time, so it must be wrapped in a<Suspense>boundary. Thefallbackships in the static shell and the real content streams in at request time.
The static shell is plain HTML (plus a serialized RSC payload for client-side navigation), so it can be served from a CDN and painted immediately, even before the server does any request-specific work.
This is the single most important consequence of the new model: reading a
cookie no longer makes the whole page dynamic. It only makes the component
that reads it dynamic. Everything above the <Suspense> boundary is still
prerendered and served instantly.
Because a route must always be able to produce a static shell, Next.js enforces this. If a component reads uncached or request data without a <Suspense> boundary above it, you get an error/insight in the dev overlay and the build fails, naming the route and the component and offering the fixes: cache the access with 'use cache', move it behind a <Suspense> boundary, or opt the segment out with export const instant = false.
Caching with 'use cache'
The 'use cache' directive marks an async function or component whose result should be cached and reused. It is paired with two helpers from next/cache:
cacheLife(profile)— how long the entry stays fresh. Built-in profiles are'seconds','minutes','hours','days','weeks'and'max', and you can define your own.cacheTag(tag)— tags the entry so it can be invalidated on demand later (withrevalidateTagorupdateTagfrom a server action).
This is exactly the pattern used by this course application to load the list of lectures:
// src/modules/lecture/server/repository.ts
import { cacheLife, cacheTag } from 'next/cache';

import { db } from '@/db';
import { lecturesTag } from './tag';

const getMany = async () => {
  'use cache';
  cacheTag(lecturesTag);
  cacheLife('max');

  return db.query.lectures.findMany({
    orderBy: (lectures, { asc }) => [asc(lectures.availableFrom)],
    with: {
      homeworks: true
    }
  });
};
The lecture list changes only when we deploy a new lecture, so it is cached with the
'max'profile and tagged. When a lecture is published, the tag is invalidated and the next request recomputes the entry — there is no need to rebuild the application.
You can put 'use cache' on a data function like above (data-level caching), or on a whole component, page or layout (UI-level caching). Note that all the arguments of the function, and any values it closes over, automatically become part of the cache key.
We will look at the caching layers, and at the older APIs this directive replaces, in the next lesson.
Streaming request data
Everything that depends on the incoming request must be read inside a <Suspense> boundary. Note that all of these request APIs are asynchronous and must be awaited — cookies(), headers() and draftMode() return promises, and params and searchParams are promises as well (this changed in Next.js v15).
import { cookies } from 'next/headers';
import { Suspense } from 'react';

async function UserGreeting() {
  const cookieStore = await cookies();
  const theme = cookieStore.get('theme')?.value ?? 'light';

  return <p>Your theme: {theme}</p>;
}

export default function Page() {
  return (
    <>
      <h1>Dashboard</h1>
      <Suspense fallback={<p>Loading...</p>}>
        <UserGreeting />
      </Suspense>
    </>
  );
}
The
<h1>is prerendered into the static shell together with theLoading...fallback. OnlyUserGreetingruns at request time.
Push the dynamic access down
The rule that follows from all of this: the deeper in the tree you await request data, the more of the page can be prerendered. If you await params at the top of a page or layout, everything below that point becomes request-bound and cannot be part of the shell. Instead, pass the promise down into a component that sits inside a <Suspense> boundary and await it there.
// The page itself is not async, so it can be fully prerendered
const Page = ({ params }: PageProps<'/lector/homeworks/[slug]'>) => (
  <Suspense fallback={<TableSkeleton />}>
    {params.then(async ({ slug }) => {
      const lecture = await lectureLoaders.get({ homeworkSlug: slug });

      return <HomeworkTable lecture={lecture} />;
    })}
  </Suspense>
);
This is a real pattern from this course application. The
paramspromise is handed straight into the JSX, and React unwraps it inside the boundary. You can also pass the whole promise as a prop to a child component andawaitit there — both approaches keep the page itself synchronous and therefore prerenderable.
Incremental Static Regeneration
Static Site Generation is still here, and it fits into the same model. For a route with a dynamic segment, generateStaticParams tells Next.js which concrete URLs to prerender at build time - in the case of e-commerce, that would be the pages of your products. Any URL that is not listed is served the reusable app shell immediately and upgraded in the background once its params are known, then cached for the next visitor. This is what Incremental Static Regeneration (ISR) means today.
Client components
To define a client component in Next.js, we must use the 'use client' directive at the very beginning of the component file, above the imports. We need these components to bring interactivity to our application, which includes form filling, editing or creating data, dynamic UI changes, etc.
The directive declares a boundary between the server and the client module graph. Once a file is marked with 'use client', all of its imports and all the components it renders directly end up in the client bundle, so you do not need to repeat the directive in every child component.
Note: nowadays, creating new data or modifying an existing entity does not require a client-side API call at all — it can be done with so-called server actions, which we will talk about in the following lessons.
Server and client components - composition pattern
To use server components in combination with client components, you need to think about them slightly differently. Before the advent of RSC, one could look at components as independent pieces of UI that could be used anywhere in the application. With RSC, we can't look at components that way. Let's explain this with a concrete example.
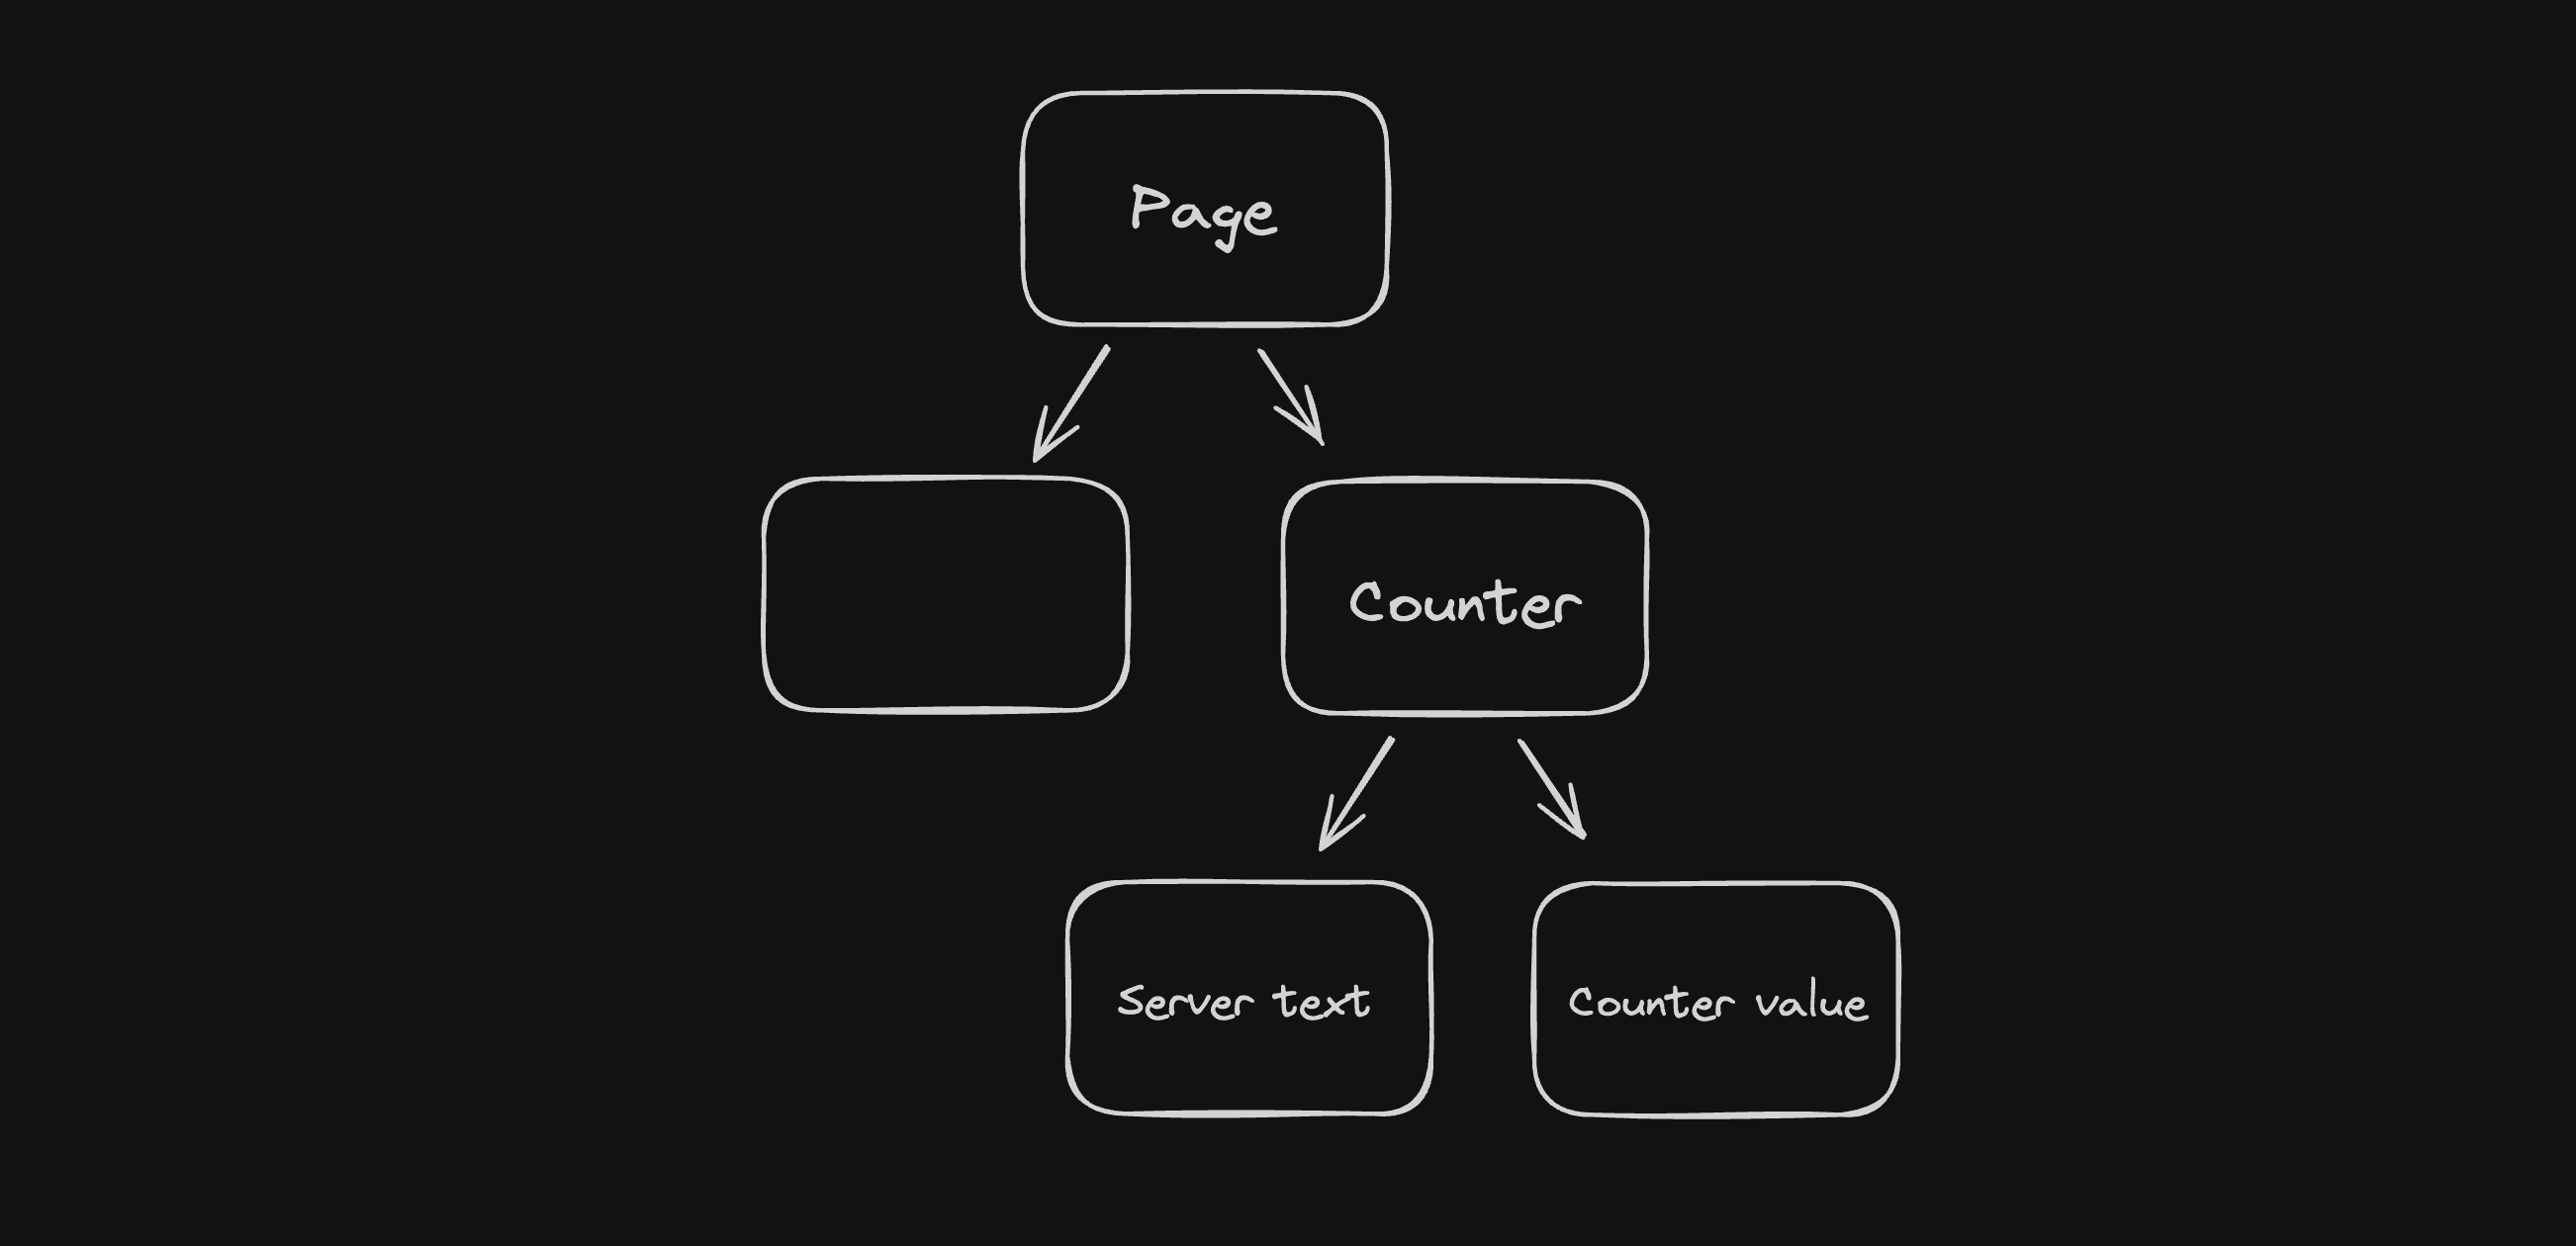
As long as all components are RSC, there is no problem. However, as the name suggests, the
Countercomponent has to be marked with'use client', since we need to keep the current value of the counter in its state.
// src/app/page.tsx
import { Counter } from '../components/counter';

const OtherComponent = () => <div />;

export default function Page() {
  return (
    <div>
      <OtherComponent />
      <Counter />
    </div>
  );
}
// src/components/counter.tsx
'use client';

import { useState } from 'react';

// ✖ Importing this into a "use client" file pulls it into the client bundle,
// where an async component cannot run
import { ServerText } from './server-text';

const CounterValue = ({ value }: { value: number }) => <div>{value}</div>;

export const Counter = () => {
  const [count, setCount] = useState(0);

  return (
    <div>
      <ServerText />
      <CounterValue value={count} />
    </div>
  );
};
// src/components/server-text.tsx
import fs from 'node:fs/promises';

export const ServerText = async () => {
  const text = await fs.readFile('src/components/text.txt', 'utf-8');
  return <div>{text}</div>;
};
This is what the code for the above diagram could look like. If we run the application like this, we will find that it does not work. The
Countercomponent is marked as a client component, and it imports and directly renders a component that is an asynchronous RSC. Because of the'use client'boundary,ServerTextis pulled into the client module graph, where it can no longer read the file system.
As we already know, when a component changes its state (in this case, the Counter component), it re-renders itself and all the components it renders. However, as we have covered in this lesson, RSCs do not re-render on the client.
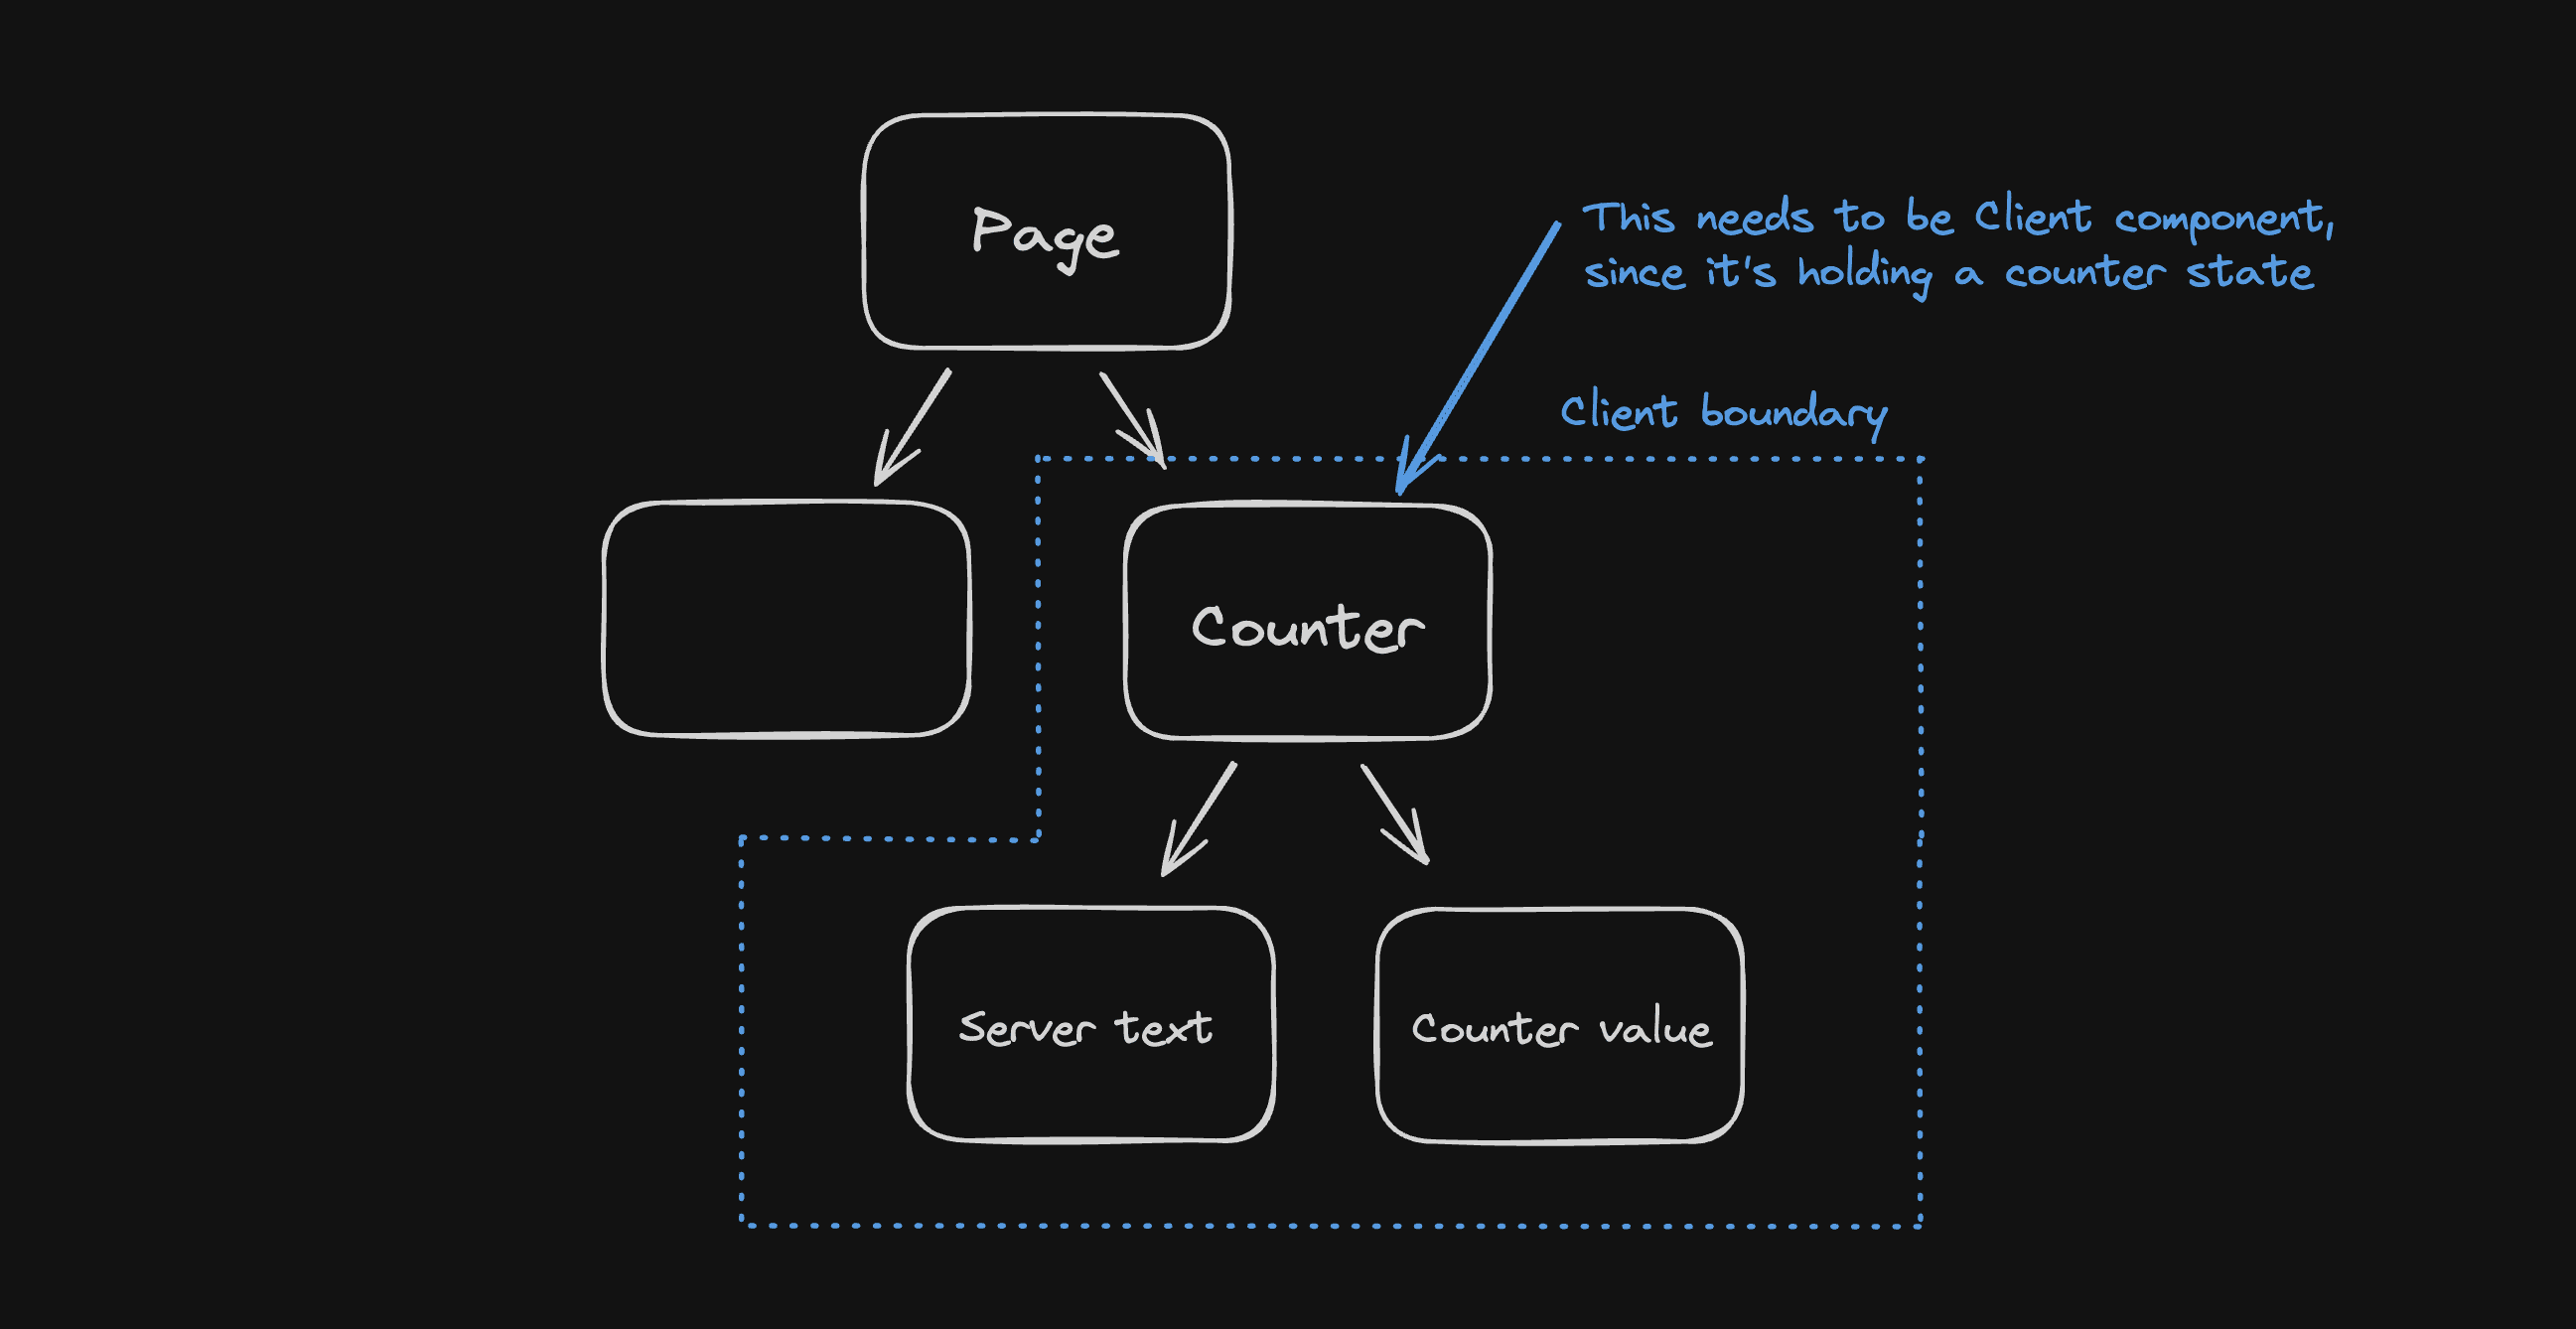
In this diagram, we can see that the
Countercomponent opens theClient boundary, i.e., all components that this component imports and renders directly become client components.
However, we would need the ServerText component to get data from the server, specifically from the file system. This brings us to the principle of how to put server and client components together.
-
The rule of thumb is that a client component cannot import a server component and render it in its tree as
<ServerComponent />. -
However, a client component can accept props,
childrenamong them. This prop is typed as{ children: ReactNode }, and it can indeed contain any React node, including a rendered server component. Such a component is not part of the client module graph — it is rendered on the server and only its output is passed to the client component. -
Note: the prop does not have to be named
children; it can have any name. The important thing is that its type isReactNode.
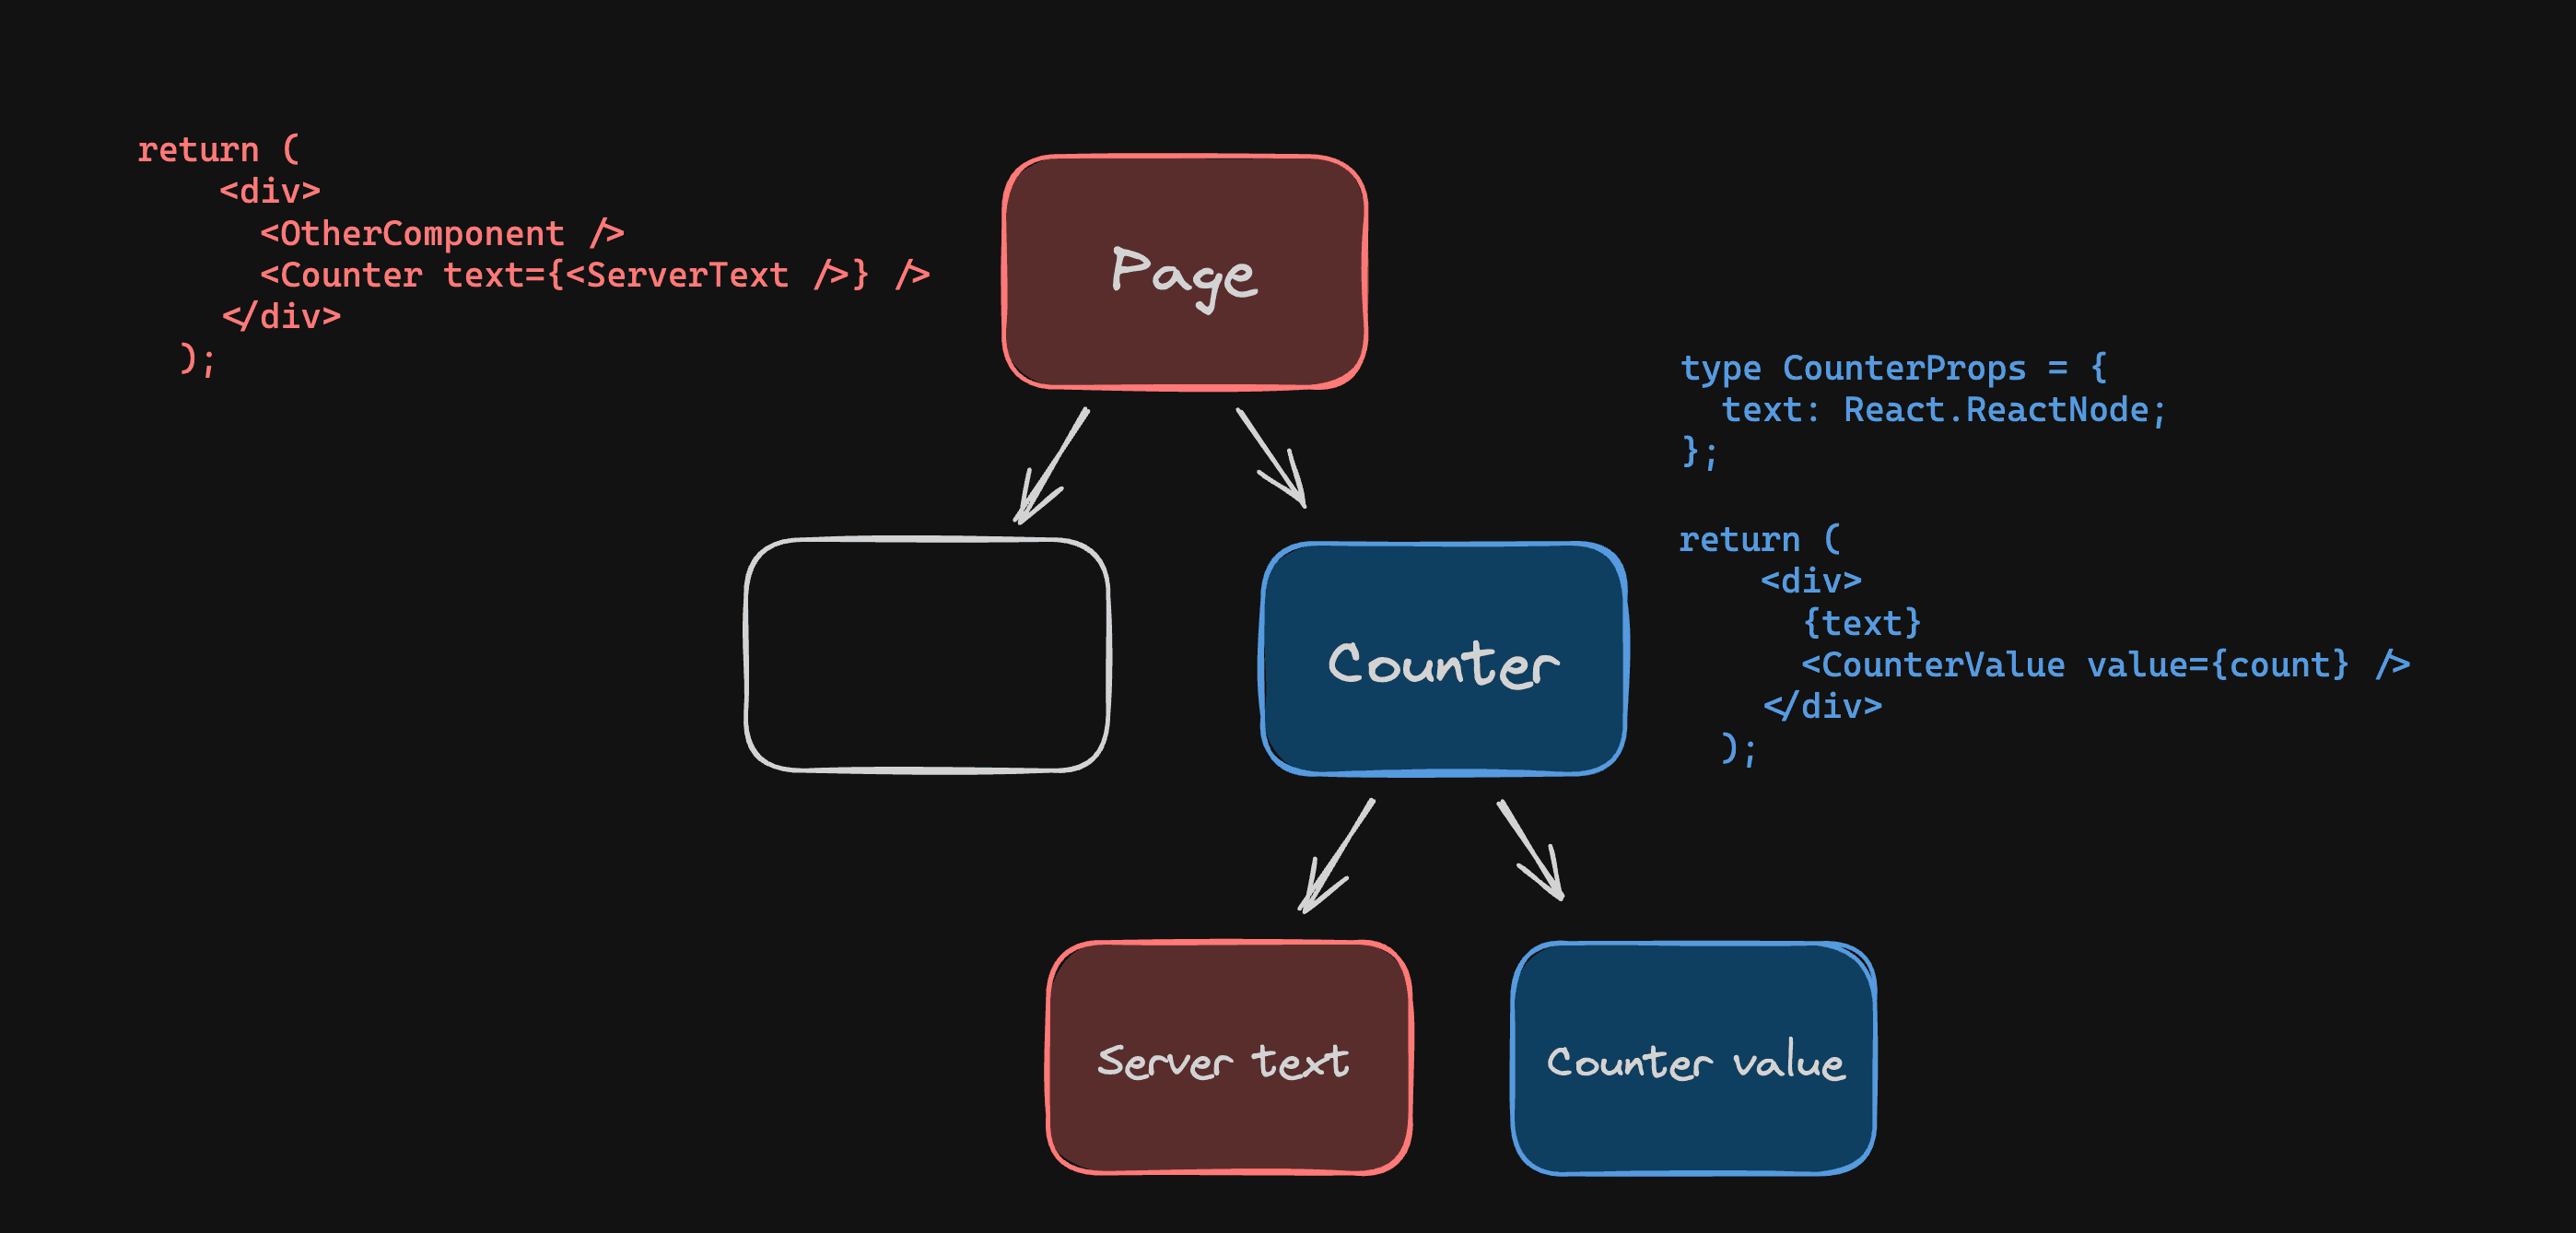
In this case, we moved the rendering from the
Countercomponent directly to thePagecomponent, which is not a client component and can therefore render server components. We pass the renderedServerTextcomponent as a prop to theCountercomponent.
Note here that the ServerText component is not re-rendered when the state of the Counter component changes. ServerText is passed as a prop, and props that are already-rendered elements are not re-rendered when the state of the receiving component changes.
// src/app/page.tsx
import { Counter } from '../components/counter';
import { ServerText } from '../components/server-text';

const OtherComponent = () => <div />;

export default function Page() {
  return (
    <div>
      <OtherComponent />
      <Counter text={<ServerText />} />
    </div>
  );
}
// src/components/counter.tsx
'use client';

import { useState } from 'react';

const CounterValue = ({ value }: { value: number }) => <div>{value}</div>;

type CounterProps = {
  text: React.ReactNode;
};

export const Counter = ({ text }: CounterProps) => {
  const [count, setCount] = useState(0);

  return (
    <div>
      {text}
      <CounterValue value={count} />
    </div>
  );
};
// src/components/server-text.tsx
import fs from 'node:fs/promises';

export const ServerText = async () => {
  const text = await fs.readFile('src/components/text.txt', 'utf-8');
  return <div>{text}</div>;
};
Providers
React context is not supported in server components, so it may seem that libraries relying on it can no longer be combined with RSC. This includes the popular data fetching library TanStack Query.
Even though data fetching on the server using asynchronous RSCs is now preferred in Next.js, fetching data from the client as before is still possible. For TanStack Query to work correctly, a QueryClientProvider has to be defined above the components that use it. Of course, this doesn't mean that the entire application has to be implemented using only client components. Using the same principle as in the Counter component example, we wrap the application in the necessary providers while still being able to use RSCs further down the tree.
// src/app/providers.tsx
'use client';

import { QueryClient, QueryClientProvider } from '@tanstack/react-query';
import { type PropsWithChildren, useState } from 'react';

export function Providers({ children }: PropsWithChildren) {
  const [queryClient] = useState(() => new QueryClient());

  return (
    <QueryClientProvider client={queryClient}>{children}</QueryClientProvider>
  );
}
As in the lecture on TanStack Query, the client is created inside the
component. Here the reason is even more visible: this file is marked 'use client', but it is still rendered on the server first. A client created next
to the component would live in the server process and be shared by every
request, and therefore by every user.
// src/app/layout.tsx
import './globals.css';

import type { Metadata } from 'next';
import { Poppins } from 'next/font/google';
import type { PropsWithChildren } from 'react';
import { Providers } from './providers';

const poppins = Poppins({
  subsets: ['latin-ext'],
  weight: ['400', '500', '600', '700']
});

export const metadata: Metadata = {
  title: 'PV247'
};

export default function RootLayout({ children }: PropsWithChildren) {
  return (
    <html lang="en">
      <body className={`flex min-h-screen flex-col ${poppins.className}`}>
        <Providers>{children}</Providers>
      </body>
    </html>
  );
}
A good habit is to render providers as deep in the tree as possible. Notice
that Providers wraps only {children} and not the whole <html> document.
The smaller the client boundary, the more of your tree Next.js can prerender
into the static shell.
Next lecture
In the next lesson, we'll look at other things about Next.js. Specifically, the ability to create custom API endpoints (route handlers) in our application. We'll explain the complex issue of caching and the possibility of invalidating each caching layer. Finally, we'll look at how to create a database and work with it in Next.js.
Assignment
This week, create a Next.js app for CRUD operations on a movie database. Implement pages for adding movies, listing all movies with edit and delete options using React Server Components, and editing movie details. Use React Hook Form, Zod for validation, and TanStack Query for API management.